Monday, January 30, 2012

Crockpot Week: Empty Cupboard Chicken

This is one of my "oops, forgot to go to the grocery store" recipes. Everything except the chicken is something you probably always have in your cabinets. I always have chicken in my freezer, so it's perfect for me.
Empty cupboard chicken
Ingredients:
1-4 chicken breasts
1 tbsp Italian seasoning
1 good shake of red pepper flakes
Pepper to taste
Water
Directions:
Place the chicken breasts in the crockpot and sprinkle with the seasonings. Add enough water to come half-way up the chicken. Cook on high for at least 2 hours or on low for 6 or more hours.
Super simple, right?

Friday, January 27, 2012

Not Ketchup

As I referred to it so cryptically in my last recipe, Not Ketchup is next up. So called because I store it in empty ketchup containers with "NOT KETCHUP" written across the top to save my poor husband a burned tongue. It is, in layman's terms, barbecue sauce.

Ingredients:
3 c ketchup (I use the cheap store brand. A flavor you like is good, but it doesn't have to be the fanciest ketchup on the block)
2 c vinegar (apple cider works best)
2 c water
2 1/2 tbsp brown sugar (dark, if you have it)
4 tsp salt
2 1/2 tsp freshly ground black pepper
3 tsp cayenne pepper

NOTE: In this and all my spicy recipes, be aware that I like hot food! If you don't, start easy and add more.

Directions:

Add everything in a pot that will leave at least two inches of space at the top for boil room. Stir it all together and simmer for about 20 minutes or until it coats the back of a wooden spoon.

For truly authentic Not Ketchup, then pour the cooled solution back into a ketchup bottle and mark "Not Ketchup."

This stuff lasts as long as ketchup in terms of "going bad", so feel free to double or even triple the recipe and stash some in your fridge.

Wednesday, January 25, 2012

Crockpot: Barbeque Pork

Next week will be crockpot week per my dear friend Cathy's request. This is just a hint (sans pictures) so she can get started.

Barbeque Pork
Ingredients:
1 pork tenderloin (2 lbs or less)
2 cps (approximately) of barbeque sauce. Whatever you like. (my personal recipe, known as "Not ketchup" )

Directions:

Cover the bottom of the crockpot with barbeque sauce. Put the pork in. Pour the rest of the barbeque sauce on top of the pork. Let cook at least 3 hours at high or 5 hours at low.


Quick and important note about crockpots/slowcookers: Every slowcooker is a little different in terms of temperature. The "high" on some will burn the bejesus out of this, while the "high" on others will just barely do the trick. Please, oh please, if this is your first time using a slowcooker, stay with it! Otherwise you may come home to charcoal in a pot. You should only need to watch it once or twice to get the general idea of just how high your slowcooker's high is.

Friday, January 20, 2012

Cheatsheet: Turnovers

Welcome to the very first Cheatsheet!

Cheatsheets are foods that look homemade, but really only partly are. They're quick, they're easy, and they're often quite elegant looking. As long as you don't let anyone know, they'll never guess that you only did the footwork!

This is a favorite of mine from when I was a kid. My mother is the queen of the "Homemade Potato Salad" (read: one that has been taken out of the container she got it in at the store and sprinkled with paprika) and these were another of her little tricks.

Turnovers

Ingredients:
1 can of crescent rolls
1 can of fruit pie filling (I used cherry)

Directions:
Preheat oven as instructed on the can. Line a cookie sheet with parchment paper. Roll out the crescent roll dough and separate it. Squish it out so the widest part is even wider.

Put about 1 spoonful of filling in the widest part of the dough. For cherry pie filling, this usually means 3-4 cherries plus surrounding goop. For apple, it generally means 1 slice, poked in half and folded over.

Fold over the short point of the dough, pinching down the side to seal in the filling.

Fold over the long point of the dough, pulling it tight around the filling, then pinching to seal. Pinch off the end. (If you're a savvy sort of person, there are enough end pinches to make one more small turnover. I, however, eat them.)

Sprinkle the turnovers with sugar and bake as directed on the crescent roll canister.

Viola!

Wednesday, January 18, 2012

Simple Cooking Spotlight: Dorot Cubes

I hate buying a whole head of garlic knowing that at least half of it will go bad before I have a chance to use it. Even worse, I hate not having garlic when I need it.

So when I found, walking through my grocery store one day, Dorot Crushed Garlic Cubes, I was in awe. An answer to my prayers! And best yet, unlike the jarred or peeled garlic I had tried on occasion, Dorot never tastes strange and is already pre-measured! I can (and do) stock up on these little guys every time they go on sale.
Dorot also makes ginger, parsley, basil, cilantro, dill, and chili cubes. My local store doesn't carry the dill, but everything else has a home in my freezer. Especially the ginger!

Monday, January 16, 2012

Quick and Easy: Chicken Kijiyaki


My thanks to Just Bento and their cookbook for this recipe (slightly altered)


Ingredients:
1 large or 2 medium/small boneless skinless chicken thighs (I know somewhere out there is a health nut saying "Oh, I'm sure it'd be just as good with chicken breasts", let me tell you- it is not.)
3 tbsp reduced sodium soy sauce (my personal quirk: feel free to use regular)
3 tbsp aji mirin (*see below for notes)
1 tbsp sugar

Directions:
Measure out the mirin and soy sauce into a small bowl. Set aside. Measure sugar into a small bowl. Set aside. This is important as the pan will be hot when you add these items. There will not be time to measure them out.

Cut chicken thighs into strips about one finger wide and 2 inches long at most. (If you will be making this recipe or other recipes using thighs like this a lot, cut a bunch and divide it out into ziplock baggies as you can see I do. They'll last several months in the freezer this way)

Set out a large nonstick skillet (you can use a different kind of pan if you'd like, but I find it always tears the chicken up). It has to be big enough so that all the chicken can lay in it, flat, barely touching or not touching at all.

Take a paper towel, fold over four times, then hold over the top of a container of vegetable oil. Flip the bottle over briefly, holding the paper towel to the top, then set it back upright. Rub down the skillet with the paper towel. This ensures the chicken will move easily and not break on lifting.

Place the chicken in the pan, making sure it lays as flat as possible. Heat to medium high. Listen for the oil/grease to start "spitting". After about 3 minutes, flip the chicken strips over. The part now facing you should be slightly browned. After another three minutes, flip those chicken thighs again, looking now for a crisp brown-ness. You may have to change their position in the pan a few times to get the best browning.

As each piece gets the crispy brown sides, pull it out of the pan and set it on a plate. Once all the pieces have been pulled out, add the sugar and mirin mixture to the pan. BE CAREFUL!!! The hot pan often causes the mirin mixture to "pop" back up towards you.

Drop the heat to medium-low and stir until sugar dissolves (no time at all). Add chicken back in and flip it a few times in the sauce until well coated. Take off the heat.

I like to serve mine on rice with edamame on the sides as shown at the top of the recipe.

*A note about mirin: This sweet rice sauce can be found in the foreign foods section of grocery stores. I figure if I can find it at Walmart, just about anyone who really wants to can find it where they are.

This is the type of mirin I prefer to cook with: aji mirin.

This is another type of mirin, which honestly I don't much care for but it generally seems to be cheaper: kotteri mirin

Saturday, January 14, 2012

Simple Cooking Spotlight: Mandolins

Who doesn't get frustrated by the careful cutting required for exactly the same size slices? Thankfully, someone (most likely French) figured out a simple device to do the sizing for us: a mandolin.

For years, I wanted one for cucumbers, carrots, apples, etc. But everywhere I looked I saw something like this costing $100 a pop. Not that I object to paying that much for a truly necessary or desired kitchen item, but why pay that much when I can find one for only $15?


This little baby is from Target. It may not have all kinds of fancy do-dads, but it gets the job done. And you know what else? It actually fits in my drawer.

Friday, January 13, 2012

Quick and Easy: "Pickles"

Do you like pickles? Are you out of pickles? Would you just like to make your own and not spend hours at it?

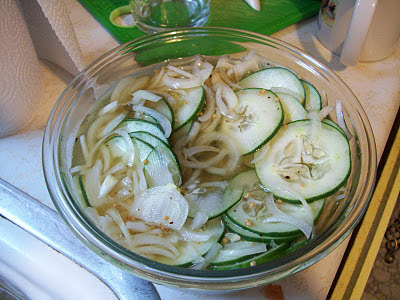
Here you are! Quick and Easy "Pickles"

Ingredients:
1 cucumber, thinly sliced (how thinly is up to you. The thinner it is, the quicker it will absorb the flavor)
1/2 small onion, thinly sliced (ditto above)
1 cup vinegar, roughly (I prefer white vinegar, others may like cider better)
1 tbsp mustard seeds
1 tsp salt
1 clove garlic
Pepper to taste
1 jalapeno or habanero (OPTIONAL! Do not add these if you don't like spicy food)
(For sweet, add 1/3 cup sugar)

Directions:
If you haven't already done so, wash and slice the cucumbers and onion. Place in a glass (or other non-metal) bowl.

In a small saucepan or skillet, bring all other ingredients (including peppers and/or sugar, if using) to a simmer (slowly bubbling).

Remove from heat, cool slightly, and pour over cucumbers/onions. Add more vinegar if necessary to cover all cucumbers. You may have to give them a few pokes to make them submerge: cucumbers float a bit.

Cover the bowl and let sit for at least 1 hour. The longer they sit, the more intense the flavor will be.