I had a chilli and salsa contest at work the other day. I got a little excited. I went out and got all the ingredients and chopped and mixed and tasted and blended and adjusted until I was sure I had it just right...
And only one other person showed up for it and she made chilli.
Oh well, this is some awesome salsa and people liked it and it will clear your sinuses right out! If you don't like to have it painfully hot, scale back the habs and leave out the Puckerbutt sauce.
Ingredients:
7 Roma or other small and largely un-seed-ish tomatoes, diced
6 cloves of garlic, roughly chopped
2 roughly chopped jalepenos
1 bell pepper, diced (I prefer red, but yellow or orange is fine. Green will change the flavor)
1 small onion, diced
2 habeneros, minced as finely as you can manage
1 lime, zested and juiced
1 tablespoon salt
1 tablespoon Puckerbutt Voodoo Prince
Directions:
Mix it all in a nonreactive (read: glass or ceramic) bowl and let sit overnight. The salt will produce the liquid "sauce" from the tomatoes and other vegetables.
P.s. I'm not kidding about the nonreactive bowl, I'm really not.
Saturday, May 2, 2015
Saturday, April 25, 2015
Chocolate Cake Roll with Ganache Filling
Cake rolls are one of those things you've probably seen a dozen times and never really considered making because...darn, they look kind of complicated, don't they?
Well, truth be told, the most complicated thing about them is whipping up the eggs and if you have a good mixer that won't even phase you, so pull out your mixer and get ready to roll!
Ingredients:
1/3 cup of flour
1/4 cup cocoa powder
1/4 teaspoon baking soda
4 egg yolks
1/2 teaspoon vanilla
1/3 cup of sugar
4 egg whites
1/2 cup of sugar
Powdered sugar (for decoration)
4 oz semi-sweet chocolate chips
1/4 cup heavy whipping cream
Directions:
Preheat oven to 375. Line a 15x10x1 inch jelly pan (if you're like me, this is just your really big cookie sheet) with parchment paper, then butter the parchment paper. Make sure the edges are as pressed down as you can.
Start by separating your eggs. Whites in one large bowl and yolks in a medium.
Beat yolks and vanilla (start slow, then go to medium speed to prevent splashes) until the color lightens to a pale yellow. Add the 1/3 cup of sugar and keep beating until you don't hear the sugar until the beaters anymore.
Rinse and dry your beaters.
Beat your egg whites (again slow, then medium) until ripples stay behind the beaters when you move them around the bowl for a moment before desolving back in (the mix will be white and foamy) Add in the remaining 1/2 cup of sugar and keep beating until the white foam starts to pull away from the sides of the bowl and touching the surface and pulling away (being VERY CAREFUL not to touch a moving beater) leaves a stiff upright peak.
Fold in the yolk mixture. Sift the flour mixture on top (you can skip sifting, but I don't recommend it due to cocoa powder's tendancy to clump) and fold in as well.
Spread the batter evenly into the prepared pan (you will have to move it around with a rubber spatula to get it into corners) and bake for 12-15 minutes or until you can gently poke the middle and have it bounce back.
MEANWHILE: place chocolate chips and heavy cream in a bowl and microwave 1 minute. Stir vigorously. It will form a smooth chocolatey paste.
Take your cake out, use the parchment paper to lift it out of the pan, and set it on an even counter. Spread the chocolate paste over it evenly. Roll up from one short end (DO NOT LET IT COOL! It will begin to harden into a shape and break when you try to roll it), stopping with the seam down. Sprinkle with powdered sugar and cut off the ends if you want to make it more attractive to look at. Store at room temperature.
Well, truth be told, the most complicated thing about them is whipping up the eggs and if you have a good mixer that won't even phase you, so pull out your mixer and get ready to roll!
Ingredients:
1/3 cup of flour
1/4 cup cocoa powder
1/4 teaspoon baking soda
4 egg yolks
1/2 teaspoon vanilla
1/3 cup of sugar
4 egg whites
1/2 cup of sugar
Powdered sugar (for decoration)
4 oz semi-sweet chocolate chips
1/4 cup heavy whipping cream
Directions:
Preheat oven to 375. Line a 15x10x1 inch jelly pan (if you're like me, this is just your really big cookie sheet) with parchment paper, then butter the parchment paper. Make sure the edges are as pressed down as you can.
Start by separating your eggs. Whites in one large bowl and yolks in a medium.
Beat yolks and vanilla (start slow, then go to medium speed to prevent splashes) until the color lightens to a pale yellow. Add the 1/3 cup of sugar and keep beating until you don't hear the sugar until the beaters anymore.
Rinse and dry your beaters.
Beat your egg whites (again slow, then medium) until ripples stay behind the beaters when you move them around the bowl for a moment before desolving back in (the mix will be white and foamy) Add in the remaining 1/2 cup of sugar and keep beating until the white foam starts to pull away from the sides of the bowl and touching the surface and pulling away (being VERY CAREFUL not to touch a moving beater) leaves a stiff upright peak.
Fold in the yolk mixture. Sift the flour mixture on top (you can skip sifting, but I don't recommend it due to cocoa powder's tendancy to clump) and fold in as well.
Spread the batter evenly into the prepared pan (you will have to move it around with a rubber spatula to get it into corners) and bake for 12-15 minutes or until you can gently poke the middle and have it bounce back.
MEANWHILE: place chocolate chips and heavy cream in a bowl and microwave 1 minute. Stir vigorously. It will form a smooth chocolatey paste.
Take your cake out, use the parchment paper to lift it out of the pan, and set it on an even counter. Spread the chocolate paste over it evenly. Roll up from one short end (DO NOT LET IT COOL! It will begin to harden into a shape and break when you try to roll it), stopping with the seam down. Sprinkle with powdered sugar and cut off the ends if you want to make it more attractive to look at. Store at room temperature.
Pan-seared Orange Roughy
White fish is the easiest fish to cook. I hate cooking fish (read: touching fish) and I find most of the white fishes easy to deal with.
In case you're wondering, white fish would include: orange roughy, cod, tilapia, and flounder. They're categorized in my mind both by their pale white flesh and their extremely neutral flavor. Anything goes with them, and for the most part people who don't care for strong fish flavors will be able to enjoy them.
So grab your skillet and get ready to sear!
Ingredients:
2 orange roughy fillets (you can substitute another white fish, but make sure the fillets are no more than an inch thick)
Approximately 1 teaspoon olive oil
Your favorite fish seasoning (I used Japanese 7 Spice from The Spice House, but salt and pepper or Old Bay are just as good)
Directions:
Dab a paper towel in the olive oil and wipe the surface of your nonstick skillet down with the olive oil. You don't want a lot of oil in the pan, just enough so that if you turn the pan towards the light there's a little greasy sheen.
Place the pan on the range and turn the heat up to medium high. Let it sit for a minute or two until, when you hold your hand about an inch over the surface, you can feel the heat (very hot)
Pat your fillets dry on a paper towel or kitchen cloth: you don't want any extra moisture from their thawing (As most fish is frozen) or the water it might've been stored in. Immediately lay each fillet in the pan, a little apart (if your pan allows. Just don't overlap) and sprinkle with seasoning.
Cook for 3 minutes. Watch the clock.
Flip with a spatula (press the spatula firmly against the bottom of the pan and swiftly move under the fish, then flip) Sprinkle seasoning again and cook another 4 minutes. There should be a bit of browning around the edges of the fish.
Fish is done when you can stick a fork in it, twist, and it flakes easily instead of "pulling" (generally speaking, these times are perfect as long as your cuts aren't any bigger than I specified)
Enjoy!
In case you're wondering, white fish would include: orange roughy, cod, tilapia, and flounder. They're categorized in my mind both by their pale white flesh and their extremely neutral flavor. Anything goes with them, and for the most part people who don't care for strong fish flavors will be able to enjoy them.
So grab your skillet and get ready to sear!
Ingredients:
2 orange roughy fillets (you can substitute another white fish, but make sure the fillets are no more than an inch thick)
Approximately 1 teaspoon olive oil
Your favorite fish seasoning (I used Japanese 7 Spice from The Spice House, but salt and pepper or Old Bay are just as good)
Directions:
Dab a paper towel in the olive oil and wipe the surface of your nonstick skillet down with the olive oil. You don't want a lot of oil in the pan, just enough so that if you turn the pan towards the light there's a little greasy sheen.
Place the pan on the range and turn the heat up to medium high. Let it sit for a minute or two until, when you hold your hand about an inch over the surface, you can feel the heat (very hot)
Pat your fillets dry on a paper towel or kitchen cloth: you don't want any extra moisture from their thawing (As most fish is frozen) or the water it might've been stored in. Immediately lay each fillet in the pan, a little apart (if your pan allows. Just don't overlap) and sprinkle with seasoning.
Cook for 3 minutes. Watch the clock.
Flip with a spatula (press the spatula firmly against the bottom of the pan and swiftly move under the fish, then flip) Sprinkle seasoning again and cook another 4 minutes. There should be a bit of browning around the edges of the fish.
Fish is done when you can stick a fork in it, twist, and it flakes easily instead of "pulling" (generally speaking, these times are perfect as long as your cuts aren't any bigger than I specified)
Enjoy!
Saturday, March 28, 2015
Baked Acorn Squash
Baked acorn squash, at least the way I fix it, is really more of a dessert than anything. Each squash will yield you two servings as the halves of the squash will become a "bowl" of delightful flavor.
Ingredients:
1 acorn squash, cut in half length wise with the seeds scooped out
4 tablespoons of butter, plus more to coat the pan
4 tablespoons of brown sugar
Mini marshmallows
Directions
Preheat your oven to 425. While you're waiting on it to warm up, coat a rimmed cookie sheet with butter. Slice a thin piece off the bottom center of your acorn squash halves so they'll stand up flat when you flip them over
Lay the squash cut side down on the baking pan. Bake for 20-25 minutes (maybe more, depending on how big your squash is) or until you can easily insert a fork into the flesh when you flip on over.
Turn the squash over (I use tongs, but I've used oven mitts, spatulas, and any number of other things in the past) so the cut side is now up. In the hollow of the squash, put the butter and the brown sugar and fill the rest of the cavity with marshmallows, mounding it slightly. Bake an additional 10-15 minutes or until the marshmallows start to brown (or burn, if you like them that way.)
Take them out and put them on plates or in bowls and serve with spoons. It's best to let them cool for a few minutes before eating as hot marshmallow to the roof of the mouth is extremely painful.
Enjoy!
Ingredients:
1 acorn squash, cut in half length wise with the seeds scooped out
4 tablespoons of butter, plus more to coat the pan
4 tablespoons of brown sugar
Mini marshmallows
Directions
Preheat your oven to 425. While you're waiting on it to warm up, coat a rimmed cookie sheet with butter. Slice a thin piece off the bottom center of your acorn squash halves so they'll stand up flat when you flip them over
Lay the squash cut side down on the baking pan. Bake for 20-25 minutes (maybe more, depending on how big your squash is) or until you can easily insert a fork into the flesh when you flip on over.
Turn the squash over (I use tongs, but I've used oven mitts, spatulas, and any number of other things in the past) so the cut side is now up. In the hollow of the squash, put the butter and the brown sugar and fill the rest of the cavity with marshmallows, mounding it slightly. Bake an additional 10-15 minutes or until the marshmallows start to brown (or burn, if you like them that way.)
Take them out and put them on plates or in bowls and serve with spoons. It's best to let them cool for a few minutes before eating as hot marshmallow to the roof of the mouth is extremely painful.
Enjoy!
Sunday, March 22, 2015
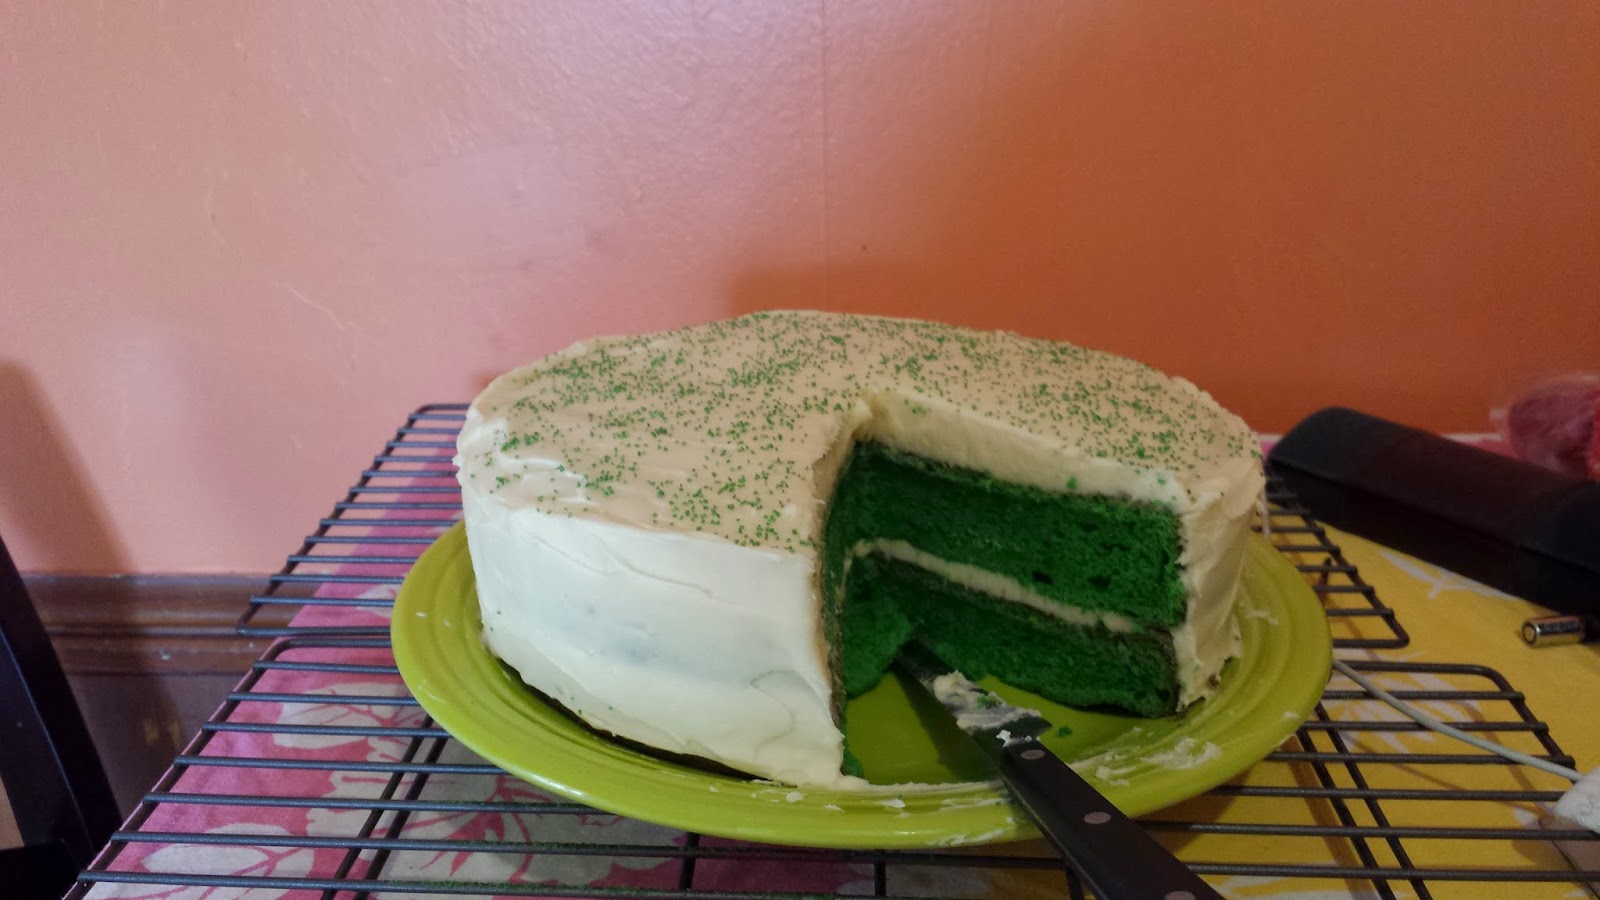
St. Patrick's Cake (Carolan's Cake)
While the Celebration Cake I made for my husband's birthday is undoubtedly very Irish with a hefty serving of Bailey's, I couldn't help but feel that a green cake with even more Irish cream would be a better St. Patrick's cake. So I set out to make the best green alcoholic cake I could!
WARNING This cake contains alcohol. Approximately 1/2 cup of it has NOT been baked out. Probably not particularly appropriate to share with small children. (Or at least not other people's small children)
Ingredients:
Cake
1 box of Duncan Hines Blue Velvet cake mix
1 box (4 serving) French vanilla instant pudding
4 eggs
1 stick of butter, melted
1 cup of Carolan's Irish Cream (or Bailey's, or whatever you prefer. I use Carolan's because it's cheaper and tastes the same)
1 cup sour cream
1 tsp vanilla extract
1/2 tsp yellow food coloring
Frosting
2 sticks of butter, softened (sitting at room temperature for about 4 hours)
1/2 a stick of cream cheese (4 oz) softened
3 cups of powdered sugar
1/2 cup of Carolan's Irish Cream (etc etc, same as above)
1 tsp vanilla extract
Directions
Preheat oven to 350. Butter two 9-inch cake pans (make sure to get the bottom corners or they may refuse to come out.)
In a large bowl, beat together all of the cake batter ingredients. Add more yellow coloring if needed to get the right shade of green. The batter will be thicker than most cake batters due to the pudding mix, so don't be alarmed.
Spoon batter into pans, dividing it as equally as you can. Smooth out as well as you can with a spatula and tap the pans on the counter a few times (knocks out the air bubbles). Now is the time to redistribute if you notice one pan is much more full than the other.
Bake for 35-45 minutes or until a toothpick inserted in the middle comes out clean.
Leave them in the pans on the stovetop (or countertop) for 10 minutes to cool, then flip out onto a cooling rack if you have one or a dishtowel if you don't. Let them cool completely (at least an hour)
In a large bowl, beat together butter and cream cheese until thoroughly combined. Add powdered sugar ON LOW* and blend until thoroughly combined (will be VERY stiff and hard to work with). Blend in the Irish cream (start slow and then you can speed up) and the vanilla.
Smooth onto the cake with a cake or rubber spatula (I've actually had better luck with the flat side of a butter knife than a rubber spatula, truth be told) and top with green sprinkles. If you want to get really fancy, take a stencil of a shamrock and hold it over the icing and only use sprinkles in that area for a nice pattern (I was not feeling that fancy)
*Go ahead. Add it on high, I dare you. Just don't come crying to me when more of that sugar is on your kitchen walls and you than in the bowl.
WARNING This cake contains alcohol. Approximately 1/2 cup of it has NOT been baked out. Probably not particularly appropriate to share with small children. (Or at least not other people's small children)
Ingredients:
Cake
1 box of Duncan Hines Blue Velvet cake mix
1 box (4 serving) French vanilla instant pudding
4 eggs
1 stick of butter, melted
1 cup of Carolan's Irish Cream (or Bailey's, or whatever you prefer. I use Carolan's because it's cheaper and tastes the same)
1 cup sour cream
1 tsp vanilla extract
1/2 tsp yellow food coloring
Frosting
2 sticks of butter, softened (sitting at room temperature for about 4 hours)
1/2 a stick of cream cheese (4 oz) softened
3 cups of powdered sugar
1/2 cup of Carolan's Irish Cream (etc etc, same as above)
1 tsp vanilla extract
Directions
Preheat oven to 350. Butter two 9-inch cake pans (make sure to get the bottom corners or they may refuse to come out.)
In a large bowl, beat together all of the cake batter ingredients. Add more yellow coloring if needed to get the right shade of green. The batter will be thicker than most cake batters due to the pudding mix, so don't be alarmed.
Spoon batter into pans, dividing it as equally as you can. Smooth out as well as you can with a spatula and tap the pans on the counter a few times (knocks out the air bubbles). Now is the time to redistribute if you notice one pan is much more full than the other.
Bake for 35-45 minutes or until a toothpick inserted in the middle comes out clean.
Leave them in the pans on the stovetop (or countertop) for 10 minutes to cool, then flip out onto a cooling rack if you have one or a dishtowel if you don't. Let them cool completely (at least an hour)
In a large bowl, beat together butter and cream cheese until thoroughly combined. Add powdered sugar ON LOW* and blend until thoroughly combined (will be VERY stiff and hard to work with). Blend in the Irish cream (start slow and then you can speed up) and the vanilla.
Smooth onto the cake with a cake or rubber spatula (I've actually had better luck with the flat side of a butter knife than a rubber spatula, truth be told) and top with green sprinkles. If you want to get really fancy, take a stencil of a shamrock and hold it over the icing and only use sprinkles in that area for a nice pattern (I was not feeling that fancy)
*Go ahead. Add it on high, I dare you. Just don't come crying to me when more of that sugar is on your kitchen walls and you than in the bowl.
Saturday, February 28, 2015
Simple (and simply) Strawberry Jam
I adore the taste of fresh strawberries, but due to an allergic husband and my inability to eat them cold I can never get through a very large amount of them before they start molding.
So the cycle usually goes like this: buy a really small amount, eat them all, feel sad about not having bought more, buy a whole bunch, eat a quarter of it, they mold, feel terrible about wasting so many, start again.
This time I was determined to break the streak and do something with all my extra berries. Jam! Not much extra in it (no interfering with the flavor!) and just glorious, glorious jam.
Ingredients:
3 pint containers of very very ripe strawberries, washed well.
2 cups of sugar
3 tablespoons of lemon juice (preferably fresh squeezed, but I won't judge)
about 2 tablespoons of lemon zest *
Directions
Cut the tops off your strawberries and quarter them. Toss them in a large sauce pan with all the other ingredients and cook on high until them mixture comes to a boil, stirring frequently. Drop down to medium and cook for 1 hour, coming back to stir about every 10-15 minutes (make sure to scrape the sides and the bottom)
Meanwhile, stick a small plate in the freezer.
At the end of the hour, take a potato masher or a blender to the mix and blend most of the lumps out (you can blend as much or as little out, depending on how lumpy you like your jam)
Now take that plate out of the freezer and drop just a little of the jam on it. Did it set up like jelly immediately or is it still kind of sloshing around? If it's sloshing, let it simmer another 15 minutes. If not, can according to a good canning site (like here) or stick it in a glass bowl and let cool before covering and refrigerating for up to 3 weeks. (Canned jelly can last up to 3 YEARS)
Enjoy!
*My secret lately has been dried lemon peel, which you can find in your spice aisle. Always on hand and I don't have to worry about grating my fingers.
So the cycle usually goes like this: buy a really small amount, eat them all, feel sad about not having bought more, buy a whole bunch, eat a quarter of it, they mold, feel terrible about wasting so many, start again.
This time I was determined to break the streak and do something with all my extra berries. Jam! Not much extra in it (no interfering with the flavor!) and just glorious, glorious jam.
Ingredients:
3 pint containers of very very ripe strawberries, washed well.
2 cups of sugar
3 tablespoons of lemon juice (preferably fresh squeezed, but I won't judge)
about 2 tablespoons of lemon zest *
Directions
Cut the tops off your strawberries and quarter them. Toss them in a large sauce pan with all the other ingredients and cook on high until them mixture comes to a boil, stirring frequently. Drop down to medium and cook for 1 hour, coming back to stir about every 10-15 minutes (make sure to scrape the sides and the bottom)
Meanwhile, stick a small plate in the freezer.
At the end of the hour, take a potato masher or a blender to the mix and blend most of the lumps out (you can blend as much or as little out, depending on how lumpy you like your jam)
Now take that plate out of the freezer and drop just a little of the jam on it. Did it set up like jelly immediately or is it still kind of sloshing around? If it's sloshing, let it simmer another 15 minutes. If not, can according to a good canning site (like here) or stick it in a glass bowl and let cool before covering and refrigerating for up to 3 weeks. (Canned jelly can last up to 3 YEARS)
Enjoy!
*My secret lately has been dried lemon peel, which you can find in your spice aisle. Always on hand and I don't have to worry about grating my fingers.
Tuesday, February 17, 2015
Speciality item: Madeleines
In this world there is a beautiful cookie. Really, it's more like a tender little butter cake served warm and sprinkled with a dusting of sugar.
And it is called a madeleine.
Now, these aren't like your basic drop cookies or roll and cuts. It does take some special equipment, a little patience, and a lot of love. But I think you'll agree once you've tasted one that the results are entirely worth it.
Our specialty equipment for this item is a madeleine pan. They're becoming more and more common, so you might even find one at Kmart or Target, but of course the internet always has you covered. Make sure it has twelve "shells" and if you can, get one with a smooth lip (Some of the older ones have a SHARP down turned edge that will cut you like a knife)
Ingredients
2 eggs, room temperature (I usually set mine out the morning I know I'm going to make them)*
1/2 teaspoon salt
1 teaspoon vanilla, best quality you can get
1 tablespoon lemon or orange zest (whichever you like the taste of better. Or you can leave this out)
1/2 cup of sugar, plus more for dusting
1/2 cup of flour, plus more to dust the pan
1/4 cup of butter, melted and cooled
Directions
Thoroughly butter your madeleine pan and dust the shells with flour (Shake out the excess)
Whisk the eggs, salt, vanilla, and zest quickly until they begin to lighten in color. Still whisking, gradually add in the sugar.
Whisk on high speed until the mixture thickens and looks to be white. As you move the whisk through the mixture, it will hold the shape of the ripples for just a moment after you move the whisk away.
Using a large spatula, sprinkle the flour a little at a time on top of the mixture and fold in (for a detailed explanation of how to fold in ingredients, go here to watch a video). Continue sprinkling on flour and folding in until you have it thoroughly mixed, making sure to scrape the sides and bottoms.
Pour the melted butter around the edges of the bowl and fold in until thoroughly mixed.
Spoon the mixture into the shells. Leave each shell a little less than full until you've filled the last one, then even them out with the remaining batter.
Bake at 375 for 14-17 minutes, or until they're golden brown and they pop back to form when you poke the middle of a shell.
Loosen the edges of the shells with your fingernails or a knife and lay them curved side up on a plate or towel and sprinkle with sugar while still warm. Eat right away!
*Room temperature eggs beat up faster. If your eggs are cold, everything will take a lot longer
And it is called a madeleine.
Now, these aren't like your basic drop cookies or roll and cuts. It does take some special equipment, a little patience, and a lot of love. But I think you'll agree once you've tasted one that the results are entirely worth it.
Our specialty equipment for this item is a madeleine pan. They're becoming more and more common, so you might even find one at Kmart or Target, but of course the internet always has you covered. Make sure it has twelve "shells" and if you can, get one with a smooth lip (Some of the older ones have a SHARP down turned edge that will cut you like a knife)
Ingredients
2 eggs, room temperature (I usually set mine out the morning I know I'm going to make them)*
1/2 teaspoon salt
1 teaspoon vanilla, best quality you can get
1 tablespoon lemon or orange zest (whichever you like the taste of better. Or you can leave this out)
1/2 cup of sugar, plus more for dusting
1/2 cup of flour, plus more to dust the pan
1/4 cup of butter, melted and cooled
Directions
Thoroughly butter your madeleine pan and dust the shells with flour (Shake out the excess)
Whisk the eggs, salt, vanilla, and zest quickly until they begin to lighten in color. Still whisking, gradually add in the sugar.
Whisk on high speed until the mixture thickens and looks to be white. As you move the whisk through the mixture, it will hold the shape of the ripples for just a moment after you move the whisk away.
Using a large spatula, sprinkle the flour a little at a time on top of the mixture and fold in (for a detailed explanation of how to fold in ingredients, go here to watch a video). Continue sprinkling on flour and folding in until you have it thoroughly mixed, making sure to scrape the sides and bottoms.
Pour the melted butter around the edges of the bowl and fold in until thoroughly mixed.
Spoon the mixture into the shells. Leave each shell a little less than full until you've filled the last one, then even them out with the remaining batter.
Bake at 375 for 14-17 minutes, or until they're golden brown and they pop back to form when you poke the middle of a shell.
Loosen the edges of the shells with your fingernails or a knife and lay them curved side up on a plate or towel and sprinkle with sugar while still warm. Eat right away!
*Room temperature eggs beat up faster. If your eggs are cold, everything will take a lot longer
Sunday, February 15, 2015
Simple dipped truffles
Sometimes you just want a plain truffle. A little soft center and a bit of crunch on the outside. Simple enough. Probably a lot more simple than you ever thought.
Ingredients:
2 bags of chocolate chips in your favorite flavor/variety (I like a mix of bittersweet and semi-sweet ghiradelli, but that's me. Go with your heart!)
1/2 cup heavy cream, plus about 2 tablespoons
1 silicone chocolate or ice cube mold (like here or here)*
Directions:
In a medium microwavable bowl, blend 1 bag's worth of chips with the heavy cream and microwave for 1 minute on high. Stir vigorously until the chocolate and cream combine (if you still have lumps of chocolate, microwave for another 30 seconds and stir again). This is the ganache.
Let the mixture cool, then pour into your mold, just short of the tops (if you overflow, just scrape smooth and back into the bowl)
Stick the mold in the freezer for about 10 minutes or until you can use your thumb to press the ganache molds out without breaking them or smashing the shapes. Put the finished shapes on a plate or pan and stick them back in the freezer while you finish the other molds.
When you're finished with all your shapes, put the remaining chocolate in another microwavable bowl and heat for 1 minute on high. Take it out and stir, then heat at 30 second intervals until you have a smooth chocolate paste.
Lay out a layer of WAX paper^.
One at a time, use a fork to dip your frozen molds into the chocolate paste and set them on the wax paper. Make sure to cover the whole mold and shake off all the extra paste.
Keep the extra molds cool in between dips: if they get too warm they'll melt into the paste.
If the paste starts to get thick, microwave it for 10 seconds and stir.
Let cool and enjoy!
*Silicone is important because of the way it will release your chocolate. If you get a hard plastic mold, it won't let loose. So don't go there. Please.
^Silicone mats are also usable, but parchment paper will stick to your finished chocolates
Ingredients:
2 bags of chocolate chips in your favorite flavor/variety (I like a mix of bittersweet and semi-sweet ghiradelli, but that's me. Go with your heart!)
1/2 cup heavy cream, plus about 2 tablespoons
1 silicone chocolate or ice cube mold (like here or here)*
Directions:
In a medium microwavable bowl, blend 1 bag's worth of chips with the heavy cream and microwave for 1 minute on high. Stir vigorously until the chocolate and cream combine (if you still have lumps of chocolate, microwave for another 30 seconds and stir again). This is the ganache.
Let the mixture cool, then pour into your mold, just short of the tops (if you overflow, just scrape smooth and back into the bowl)
Stick the mold in the freezer for about 10 minutes or until you can use your thumb to press the ganache molds out without breaking them or smashing the shapes. Put the finished shapes on a plate or pan and stick them back in the freezer while you finish the other molds.
When you're finished with all your shapes, put the remaining chocolate in another microwavable bowl and heat for 1 minute on high. Take it out and stir, then heat at 30 second intervals until you have a smooth chocolate paste.
Lay out a layer of WAX paper^.
One at a time, use a fork to dip your frozen molds into the chocolate paste and set them on the wax paper. Make sure to cover the whole mold and shake off all the extra paste.
Keep the extra molds cool in between dips: if they get too warm they'll melt into the paste.
If the paste starts to get thick, microwave it for 10 seconds and stir.
Let cool and enjoy!
*Silicone is important because of the way it will release your chocolate. If you get a hard plastic mold, it won't let loose. So don't go there. Please.
^Silicone mats are also usable, but parchment paper will stick to your finished chocolates
Monday, January 12, 2015
Saturday, January 10, 2015
Jelly Glaze (for chicken or fish)
Sometimes you want something a little bit different on your chicken or fish. Maybe you recently tried a glazed white meat and fell in love with the slightly sweet golden-brown coating. Maybe you've just seen pictures and you're ready to make the leap.
Either way, you should know it's really very easy! Most glazes for meat are basically just jelly and something to thin it out. So here's a very basic recipe you can change around a bit to get a great flavor for you.
Ingredients:
3 tablespoons of sweet jelly (I like Puckerbutt's Lemon Jelly with pepper, but peach, lemon, and other relatively light flavored jellies do just as well)
2 teaspoons of a very light wine (sometimes I substitute sake if I have that instead)
Directions:
Mix your jelly and wine together in a small bowl, stirring until you've knocked out all the big chunks.
Preheat a real or electric grill. If you have a George Foreman-type grill, no need to grease, but real grills will need a very light coating of vegetable oil to keep the meat from sticking.
Grill your meat until it's about halfway done (about 4 minutes on a regular grill, 2 on an electric for chicken breasts), then brush the jelly mix onto the top, flip, and coat the other side. Let it grill some more until you have a nice golden color to the glaze, about another 2-3 minutes. (it's the sugar in the jelly that does this, but if you've used a dark jelly it may not be so noticeable)
This recipe makes enough for about 4 chicken breasts or several shrimp kabobs. Leftover glaze SHOULD NOT be stored as it will have come in contact with the juices of the raw meat.
Either way, you should know it's really very easy! Most glazes for meat are basically just jelly and something to thin it out. So here's a very basic recipe you can change around a bit to get a great flavor for you.
Ingredients:
3 tablespoons of sweet jelly (I like Puckerbutt's Lemon Jelly with pepper, but peach, lemon, and other relatively light flavored jellies do just as well)
2 teaspoons of a very light wine (sometimes I substitute sake if I have that instead)
Directions:
Mix your jelly and wine together in a small bowl, stirring until you've knocked out all the big chunks.
Preheat a real or electric grill. If you have a George Foreman-type grill, no need to grease, but real grills will need a very light coating of vegetable oil to keep the meat from sticking.
Grill your meat until it's about halfway done (about 4 minutes on a regular grill, 2 on an electric for chicken breasts), then brush the jelly mix onto the top, flip, and coat the other side. Let it grill some more until you have a nice golden color to the glaze, about another 2-3 minutes. (it's the sugar in the jelly that does this, but if you've used a dark jelly it may not be so noticeable)
This recipe makes enough for about 4 chicken breasts or several shrimp kabobs. Leftover glaze SHOULD NOT be stored as it will have come in contact with the juices of the raw meat.
Tuesday, December 9, 2014
Rotisserie Chicken and Cheddar Parsley Dumplings
Another thing to do with your rotisserie chicken the next day!
Ingredients (soup)
The bits of meat, LARGE bones (like drumsticks) and skin picked off of 1 rotisserie chicken that were too small to bother eating. Don't get ligaments or chewy bits.
About 4 cups of chicken stock
2 stalks celery
1 onion, quartered
About 1 tsp freshly ground pepper (more to taste)
1 spring of thyme (optional)
Ingredients (dumplings the best way)
1 1/2 cup self-rising flour (next to the regular flour. You can get it at any store. Promise.)
1/2 cup shredded cheddar cheese
1/4 cup fresh chopped parsley
1/4 cup cold butter
1/4 cup milk, plus more as needed
Ingredients (dumplings the fast way)
1 1/2 cup Bisquick (Don't even ask me where you can buy this. Don't.)
1/2 cup shredded cheddar cheese
1/4 fresh chopped parsley
1/4 cup milk, plus more as needed
Directions:
Load all your soup ingredients, minus the stock, in a large crockpot, then cover with the stock plus enough water to come within about two inches of the top of the pot. Cover and cook at least 6 hours on high.
About thirty minutes before you'd like to serve, put together your dumplings.
For the BEST WAY dumplings, mix together all the dry ingredients, then cut in the cold butter using knives or a pastry cutter until you have tiny chunks of butter throughout. Then mix in just enough milk to make everything stick together. The dough shouldn't be sticky.
For FAST WAY dumplings, mix the dry ingredients together, then mix in just enough milk to make everything stick together. (I hope you're happy with yourself.)
Form dumpling mix into about 10 small balls and drop into the soup. They'll sink at first, don't worry. Cover the pot again and leave it for about 10 minutes. Chow down!
Ingredients (soup)
The bits of meat, LARGE bones (like drumsticks) and skin picked off of 1 rotisserie chicken that were too small to bother eating. Don't get ligaments or chewy bits.
About 4 cups of chicken stock
2 stalks celery
1 onion, quartered
About 1 tsp freshly ground pepper (more to taste)
1 spring of thyme (optional)
Ingredients (dumplings the best way)
1 1/2 cup self-rising flour (next to the regular flour. You can get it at any store. Promise.)
1/2 cup shredded cheddar cheese
1/4 cup fresh chopped parsley
1/4 cup cold butter
1/4 cup milk, plus more as needed
Ingredients (dumplings the fast way)
1 1/2 cup Bisquick (Don't even ask me where you can buy this. Don't.)
1/2 cup shredded cheddar cheese
1/4 fresh chopped parsley
1/4 cup milk, plus more as needed
Directions:
Load all your soup ingredients, minus the stock, in a large crockpot, then cover with the stock plus enough water to come within about two inches of the top of the pot. Cover and cook at least 6 hours on high.
About thirty minutes before you'd like to serve, put together your dumplings.
For the BEST WAY dumplings, mix together all the dry ingredients, then cut in the cold butter using knives or a pastry cutter until you have tiny chunks of butter throughout. Then mix in just enough milk to make everything stick together. The dough shouldn't be sticky.
For FAST WAY dumplings, mix the dry ingredients together, then mix in just enough milk to make everything stick together. (I hope you're happy with yourself.)
Form dumpling mix into about 10 small balls and drop into the soup. They'll sink at first, don't worry. Cover the pot again and leave it for about 10 minutes. Chow down!
Saturday, November 29, 2014
The flakiest pie crust
Some people hate the crust, some people love it. Personally, I am for the tastiest crusts you can find, but I had a grandmother who made the real deal.
Do not expect this to taste like a flavor-less grocery store crust (though it might not be as pretty), but do expect a flaky, tasty finished product.
This recipe makes two crusts: a top and a bottom to a covered pie, or two separate bottom-only pies.
Ingredients:
2 sticks of butter, cold but not frozen (sitting in the fridge overnight, at the least)*
2 1/2 cups flour (I like do 2 1/4 cups flour and 1/4 cup almond flour or ground almonds for the flavor and crunch, but that's purely personal)
1 tablespoon sugar
1 teaspoon salt
1 cup of water
Directions:
Set your water in the freezer while you do the first steps. You want it to be very cold.
Put flour and almond flour (if using) in a large mixing bowl with sugar and salt. Give it a quick stir to make sure the sugar and salt are evenly mixed throughout the flour.
Set the COLD butter (I mean it! Not room temperature, melted, or soft. COLD) in the bowl. With a pastry cutter (see one here) or two knives, cut the butter up into the flour until it looks like cornmeal (you'll still see flecks of butter. That's fine! It makes it tastier)
Now pull your water out of the freezer and add it in. Start with 4 tablespoons, then work your way up one tablespoon at a time until the dough is sticking together, but not sticky on the outside. If a little flour remains on the bottom, press the dough down into it and knead just a few times (You don't want it to get hot) until the flour is all incorporated.
Divide dough in half and pat into a disc. Cover with cling wrap and set in the fridge for at least 2 hours. (I've found that leaving the dough overnight can make it too hard to work with for me. I don't much recommend it.)
Take your discs out and roll them out, one at a time, on a lightly floured surface. You'll probably need to put a bit on top of the dough too to keep it from sticking to your rolling pin. Dough should be about 1/4 inch thick to stretch out to the proper size for a 9 inch pie pan. To make moving the crust over to the pan easier, roll it around your rolling pin, then slide it off into the pan.
For the most attractive crust you can manage, fold any excess crust back under the edges forming a fairly regular circle around the edge of the pan. Then, using your thumbs, press the dough over and in with just a little space in between your thumbs all the way around.
Bake about 10 minutes before you add the pie filling, or as the recipe directs. (without filling, the bottom can rise. You can put a handful of dried beans in the bottom or pie beads and it will keep it flat. Really not the end of the world, though.
*Do not melt your butter or soften it! If you do, you'll have a thick, solid, dense pie crust.
Do not expect this to taste like a flavor-less grocery store crust (though it might not be as pretty), but do expect a flaky, tasty finished product.
This recipe makes two crusts: a top and a bottom to a covered pie, or two separate bottom-only pies.
Ingredients:
2 sticks of butter, cold but not frozen (sitting in the fridge overnight, at the least)*
2 1/2 cups flour (I like do 2 1/4 cups flour and 1/4 cup almond flour or ground almonds for the flavor and crunch, but that's purely personal)
1 tablespoon sugar
1 teaspoon salt
1 cup of water
Directions:
Set your water in the freezer while you do the first steps. You want it to be very cold.
Put flour and almond flour (if using) in a large mixing bowl with sugar and salt. Give it a quick stir to make sure the sugar and salt are evenly mixed throughout the flour.
Set the COLD butter (I mean it! Not room temperature, melted, or soft. COLD) in the bowl. With a pastry cutter (see one here) or two knives, cut the butter up into the flour until it looks like cornmeal (you'll still see flecks of butter. That's fine! It makes it tastier)
Now pull your water out of the freezer and add it in. Start with 4 tablespoons, then work your way up one tablespoon at a time until the dough is sticking together, but not sticky on the outside. If a little flour remains on the bottom, press the dough down into it and knead just a few times (You don't want it to get hot) until the flour is all incorporated.
Divide dough in half and pat into a disc. Cover with cling wrap and set in the fridge for at least 2 hours. (I've found that leaving the dough overnight can make it too hard to work with for me. I don't much recommend it.)
Take your discs out and roll them out, one at a time, on a lightly floured surface. You'll probably need to put a bit on top of the dough too to keep it from sticking to your rolling pin. Dough should be about 1/4 inch thick to stretch out to the proper size for a 9 inch pie pan. To make moving the crust over to the pan easier, roll it around your rolling pin, then slide it off into the pan.
For the most attractive crust you can manage, fold any excess crust back under the edges forming a fairly regular circle around the edge of the pan. Then, using your thumbs, press the dough over and in with just a little space in between your thumbs all the way around.
Bake about 10 minutes before you add the pie filling, or as the recipe directs. (without filling, the bottom can rise. You can put a handful of dried beans in the bottom or pie beads and it will keep it flat. Really not the end of the world, though.
*Do not melt your butter or soften it! If you do, you'll have a thick, solid, dense pie crust.
Wednesday, November 26, 2014
Onion bagels (Like a BOSS!)
If you, like me, love the poor misunderstood onion bagel, then you know the pain of trying to find them in a grocery store. As the years go on, it seems you can find them less and less places, and even when you do they're just not as great as you remember.
So what's an onion bagel lover to do? Make them, obviously!
Ingredients:
2 cups warm water*
2 packages dry yeast (or 4 1/2 teaspoons of the kind you get in a jar)
3 tablespoons sugar
1 tablespoon salt (I like rock salt, but that's me. Doesn't actually matter too much)
1/2 chopped dehydrated onions (they're in your spice aisle, usually on the bottom shelf in a big jar)
5 cups of flour, plus more if needed
1 tablespoon baking soda
Directions:
Mix the water and sugar together in a large mixing bowl, then sprinkle the yeast on top. Let it sit for about 10 minutes (If you don't have a foamy top of active yeast after ten minutes, your yeast is dead. Start over with new yeast. DO NOT go any further with the recipe if your yeast isn't rising)
Stir in salt and onions, then add in flour. Start with 3 cups, then work your way up until you're kneading the dough and it isn't sticky at all anymore.
Coat dough with melted butter on all sides, cover, and let rise 40 minutes.
Dust a large work surface with flour. Divide dough into 16 evenly sized (or nearly evenly sized) pieces. Roll each piece into a ball, then poke through the middle with your thumbs. Turn the dough in your hands, stretching slightly and molding the outside, until you have a donut shape with a LARGE hole^ Lay them out on the floured surface a few inches apart, cover, and let rise another 15 minutes.
Broil bagels in your oven (mine automatically sets to 500. That's fine) for about 4 minutes on the top rack. Basically you want them to start to brown EVER so slightly.
In a large saucepan, place about 4 cups of water and the baking soda and bring it to a boil. Drop in a few bagels at a time (their sides touching is ok, but don't stack them) and turn once a minute for 3 minutes. Pull them out and place them on a towel for a moment to absorb extra moisture, then put on your baking sheet. Repeat until you've boiled all the bagels.
Preheat oven to 400. Bake bagels 25-30 minutes (tops should be lightly golden).
Eat immediately or cool, slice, and freeze.
*To get the temperature right, I usually heat 1 cup in the microwave and then add the other at room temperature
^As the dough rises, the holes will close up a little. Small hole=no hole after rising.
So what's an onion bagel lover to do? Make them, obviously!
Ingredients:
2 cups warm water*
2 packages dry yeast (or 4 1/2 teaspoons of the kind you get in a jar)
3 tablespoons sugar
1 tablespoon salt (I like rock salt, but that's me. Doesn't actually matter too much)
1/2 chopped dehydrated onions (they're in your spice aisle, usually on the bottom shelf in a big jar)
5 cups of flour, plus more if needed
1 tablespoon baking soda
Directions:
Mix the water and sugar together in a large mixing bowl, then sprinkle the yeast on top. Let it sit for about 10 minutes (If you don't have a foamy top of active yeast after ten minutes, your yeast is dead. Start over with new yeast. DO NOT go any further with the recipe if your yeast isn't rising)
Stir in salt and onions, then add in flour. Start with 3 cups, then work your way up until you're kneading the dough and it isn't sticky at all anymore.
Coat dough with melted butter on all sides, cover, and let rise 40 minutes.
Dust a large work surface with flour. Divide dough into 16 evenly sized (or nearly evenly sized) pieces. Roll each piece into a ball, then poke through the middle with your thumbs. Turn the dough in your hands, stretching slightly and molding the outside, until you have a donut shape with a LARGE hole^ Lay them out on the floured surface a few inches apart, cover, and let rise another 15 minutes.
Broil bagels in your oven (mine automatically sets to 500. That's fine) for about 4 minutes on the top rack. Basically you want them to start to brown EVER so slightly.
In a large saucepan, place about 4 cups of water and the baking soda and bring it to a boil. Drop in a few bagels at a time (their sides touching is ok, but don't stack them) and turn once a minute for 3 minutes. Pull them out and place them on a towel for a moment to absorb extra moisture, then put on your baking sheet. Repeat until you've boiled all the bagels.
Preheat oven to 400. Bake bagels 25-30 minutes (tops should be lightly golden).
Eat immediately or cool, slice, and freeze.
*To get the temperature right, I usually heat 1 cup in the microwave and then add the other at room temperature
^As the dough rises, the holes will close up a little. Small hole=no hole after rising.
Saturday, November 8, 2014
Leftover Rotisserie Chicken Noodle Soup
You're looking at that rotisserie chicken you bought, thinking there's enough meat left on it to do something, but what? Not really enough for another full meal, but maybe...
Soup! The original way to stretch a little bit of food a long way (Ever read Stone Soup? You should.)
Warning: since you're using the whole chicken, you will be fishing out bones. They add a lot of flavor, but they can kind of weird out the squeamish.
Ingredients:
The leftover body of your rotisserie chicken (that means the wings, legs, bones, skin, etc, etc)
1 onion, peeled and quartered
2-4 stalks of celery, as you prefer, chopped up roughly
Approximately 1/2 cup of roughly diced whole carrots or chopped baby carrots
A sprig of thyme, if you have it, or some freshly ground pepper if you don't
1/2 a bag of egg noodles
Directions:
Lay the chicken down in a crock pot and pour water over it until it's about 3/4s covered. Add in everything else. Cover and cook on high at least 4 hours.
Fish out the bones and the thyme if you added it.
Toss in noodles, stir them in, and let it cook another 10-15 minutes (just letting the noodles soak up juice, really)
Enjoy!
Soup! The original way to stretch a little bit of food a long way (Ever read Stone Soup? You should.)
Warning: since you're using the whole chicken, you will be fishing out bones. They add a lot of flavor, but they can kind of weird out the squeamish.
Ingredients:
The leftover body of your rotisserie chicken (that means the wings, legs, bones, skin, etc, etc)
1 onion, peeled and quartered
2-4 stalks of celery, as you prefer, chopped up roughly
Approximately 1/2 cup of roughly diced whole carrots or chopped baby carrots
A sprig of thyme, if you have it, or some freshly ground pepper if you don't
1/2 a bag of egg noodles
Directions:
Lay the chicken down in a crock pot and pour water over it until it's about 3/4s covered. Add in everything else. Cover and cook on high at least 4 hours.
Fish out the bones and the thyme if you added it.
Toss in noodles, stir them in, and let it cook another 10-15 minutes (just letting the noodles soak up juice, really)
Enjoy!
Thursday, October 9, 2014
Super simple grilled Tofu
Some people are curious about tofu, but just have no clue where to start. If that's you, give this recipe a try.
Ingredients:
1 block of firm or extra firm tofu, well drained/pressed*
Roughly 2 tablespoons olive oil
A shaker of your favorite seasoning blend (The first time I made this, I used a mix called Parisienne Melange, but what you're seeing here is actually Kroger's Original Seasoning, a saltless mix)
Directions
Warm up your grill, or electric grill (like I'm using here. Got it for $10 at lowes, go figure.)
Cut the tofu in half length-wise, then in half again width-wise. If you want the triangles like I have here, cut along the diagonal for each piece. (Total of 8 pieces with the diagonal, 4 without)
Brush the top of each piece with your oil, then sprinkle with seasoning and turn oiled-side down on the grill. If you're using an electric grill, go ahead and brush and season the top as well before closing the lid. If you're using a regular grill, wait to oil and season until right before you flip them (otherwise the oil sinks in and they taste super greasy)
Grill for 8 minutes (per side, if you're doing it on the grill) or until the outside turns golden brown.
*There are tofu presses out there that you can buy, but unless you eat a lot of tofu I wouldn't bother. Instead, wrap the tofu in a clean dishcloth, set it on a plate, and put another plate on top. Weigh the top plate down with cans or books, and leave it at least 4 hours, preferably overnight.
Ingredients:
1 block of firm or extra firm tofu, well drained/pressed*
Roughly 2 tablespoons olive oil
A shaker of your favorite seasoning blend (The first time I made this, I used a mix called Parisienne Melange, but what you're seeing here is actually Kroger's Original Seasoning, a saltless mix)
Directions
Warm up your grill, or electric grill (like I'm using here. Got it for $10 at lowes, go figure.)
Cut the tofu in half length-wise, then in half again width-wise. If you want the triangles like I have here, cut along the diagonal for each piece. (Total of 8 pieces with the diagonal, 4 without)
Brush the top of each piece with your oil, then sprinkle with seasoning and turn oiled-side down on the grill. If you're using an electric grill, go ahead and brush and season the top as well before closing the lid. If you're using a regular grill, wait to oil and season until right before you flip them (otherwise the oil sinks in and they taste super greasy)
Grill for 8 minutes (per side, if you're doing it on the grill) or until the outside turns golden brown.
*There are tofu presses out there that you can buy, but unless you eat a lot of tofu I wouldn't bother. Instead, wrap the tofu in a clean dishcloth, set it on a plate, and put another plate on top. Weigh the top plate down with cans or books, and leave it at least 4 hours, preferably overnight.
Saturday, August 16, 2014
Simply Shortbread
Shortbread is a fantastic basic cookie and a great basic dough to play with the flavors in. If you're a food watcher like I am, you've probably seen a bunch of new flavors emerging: Rosemary Pistachio, Lavender, Lemon Calendula, and other wild things. There's nothing wrong with it, they're all tasty! But I recommend walking before you run. (See the end of the recipe for the best ways to modify)
Looking for something that's really hard to mess up? Shortbread.
Something to ship for the holidays (or a birthday. Or a "get well soon". Or just because someone really likes cookies.)? Shortbread.
Like cookies, but don't want something too sweet? Shortbread.
Basically, it's just the best cookie ever.
Ingredients:
1 cup (2 sticks) of room temperature butter.*
1/2 cup of sugar
2 teaspoons vanilla extract (the better quality you can get, the tastier!)
1/2 teaspoon almond extract (optional, but it's a definite bonus. Try with and without to see what I mean)
2 cups flour
Directions:
Blend your butter and sugar together until creamy (easiest to use a hand or stand mixer, but a brave soul can do it with a whisk or a fork) Add the extracts and blend again. Add in flour** and blend well, making sure to get out any lumps. Lumpy is not tasty! Also: if you're using a mixer, be careful not to do this part on high when you first start or you will get flour EVERYWHERE.
For pretty flat cookies like the ones above, lay out a long piece of cling wrap (about the length of your forearm) and squish the dough into a log shape on it. Try to get it as round as possible and squish your ends flat. Then roll the log up in the plastic wrap (you can roll it on the counter at this stage if it's still not round enough for you) and stick it in the fridge for about an hour.
For "I don't care, I'm just going to eat it" cookies***, just stick your bowl in the fridge for about an hour with a plate or plastic wrap on top to keep the dough from drying out.
Preheat the oven to 350. Line two cookie sheets with parchment paper^.
If you're making the flat cookies, pull out the dough, unwrap (leave it sitting on the wrap: you just need to be able to cut it), and slice about 1/4 inch thick. Place them on the pan with a little space between them.
For the "I don't care" cookies, scoop out about a tablespoon sized ball, roll or squish, and set them down with a little space in between.
Bake 15-20 minutes or until the edges are very lightly browned. By the time they get dark or the rest of the cookie starts to brown they are burnt. They will still give slightly if you gently touch the top of the cookie.
Let cookies cool completely on a rack before packaging or eat right away!
*Your butter should be soft when you poke it, almost like peanut butter.
**If you do decide to add in flavors, add dry "spice" flavors (any spices or flower flavors like cinnamon or lavender) when you add the flour and add "chunky" flavors after you've mixed all the dough together.
***These cookies crumble easier than the flat ones. I wouldn't recommend them if you're going to try to ship them or try to transport them at all, though they're absolutely fine for eating!
^It has been my experience that cookie sheets that have that black grunge that older sheet have will burn the bottom of your cookies, even through the parchment paper. Beware.
Looking for something that's really hard to mess up? Shortbread.
Something to ship for the holidays (or a birthday. Or a "get well soon". Or just because someone really likes cookies.)? Shortbread.
Like cookies, but don't want something too sweet? Shortbread.
Basically, it's just the best cookie ever.
Ingredients:
1 cup (2 sticks) of room temperature butter.*
1/2 cup of sugar
2 teaspoons vanilla extract (the better quality you can get, the tastier!)
1/2 teaspoon almond extract (optional, but it's a definite bonus. Try with and without to see what I mean)
2 cups flour
Directions:
Blend your butter and sugar together until creamy (easiest to use a hand or stand mixer, but a brave soul can do it with a whisk or a fork) Add the extracts and blend again. Add in flour** and blend well, making sure to get out any lumps. Lumpy is not tasty! Also: if you're using a mixer, be careful not to do this part on high when you first start or you will get flour EVERYWHERE.
For pretty flat cookies like the ones above, lay out a long piece of cling wrap (about the length of your forearm) and squish the dough into a log shape on it. Try to get it as round as possible and squish your ends flat. Then roll the log up in the plastic wrap (you can roll it on the counter at this stage if it's still not round enough for you) and stick it in the fridge for about an hour.
For "I don't care, I'm just going to eat it" cookies***, just stick your bowl in the fridge for about an hour with a plate or plastic wrap on top to keep the dough from drying out.
Preheat the oven to 350. Line two cookie sheets with parchment paper^.
If you're making the flat cookies, pull out the dough, unwrap (leave it sitting on the wrap: you just need to be able to cut it), and slice about 1/4 inch thick. Place them on the pan with a little space between them.
For the "I don't care" cookies, scoop out about a tablespoon sized ball, roll or squish, and set them down with a little space in between.
Bake 15-20 minutes or until the edges are very lightly browned. By the time they get dark or the rest of the cookie starts to brown they are burnt. They will still give slightly if you gently touch the top of the cookie.
Let cookies cool completely on a rack before packaging or eat right away!
*Your butter should be soft when you poke it, almost like peanut butter.
**If you do decide to add in flavors, add dry "spice" flavors (any spices or flower flavors like cinnamon or lavender) when you add the flour and add "chunky" flavors after you've mixed all the dough together.
***These cookies crumble easier than the flat ones. I wouldn't recommend them if you're going to try to ship them or try to transport them at all, though they're absolutely fine for eating!
^It has been my experience that cookie sheets that have that black grunge that older sheet have will burn the bottom of your cookies, even through the parchment paper. Beware.
Tuesday, July 29, 2014
Coffee (And other flavors) Agar
Sometimes I like to make something a little weird and give it a go. Sometimes that works out for me, other times it turns out really gross.
Agar Agar is a Jell-o like item from Asia (usually Japan) that can be all sorts of fun. You name the flavor, you can make it. Everything from the innocent orange juice to the darker coffee. You can also put little chunks of fruit in it. My favorite so far has been to make it with Mango Tango Odwalla smoothie and put bits of banana in it. So here's how you do it!
Ingredients:
2 cups of coffee (or other liquid if you're changing the flavor)
3 tbsp sugar (adjust this for juices! They don't need as much because they're already sweet. I do still recommend some sugar, though)
1 tbsp agar agar powder (find at your local health food or foreign food store OR online)
Directions:
In a saucepan (does not need to be large), sprinkle about two tablespoons of the coffe, then sprinkle the sugar and agar agar powder over it. Stir to mix together, scraping the bottom. Add in the rest of the coffee.
Bring to a simmer, then remove from the heat and pour into a 9x9 baking pan (no need to grease! I have no idea why, but this stuff doesn't stick.)
Let cool to room temperature, then put in the fridge. Ready to eat whenever you're ready to eat it!
Agar Agar is a Jell-o like item from Asia (usually Japan) that can be all sorts of fun. You name the flavor, you can make it. Everything from the innocent orange juice to the darker coffee. You can also put little chunks of fruit in it. My favorite so far has been to make it with Mango Tango Odwalla smoothie and put bits of banana in it. So here's how you do it!
Ingredients:
2 cups of coffee (or other liquid if you're changing the flavor)
3 tbsp sugar (adjust this for juices! They don't need as much because they're already sweet. I do still recommend some sugar, though)
1 tbsp agar agar powder (find at your local health food or foreign food store OR online)
Directions:
In a saucepan (does not need to be large), sprinkle about two tablespoons of the coffe, then sprinkle the sugar and agar agar powder over it. Stir to mix together, scraping the bottom. Add in the rest of the coffee.
Bring to a simmer, then remove from the heat and pour into a 9x9 baking pan (no need to grease! I have no idea why, but this stuff doesn't stick.)
Let cool to room temperature, then put in the fridge. Ready to eat whenever you're ready to eat it!
Saturday, June 14, 2014
Double Meat Meatloaf
I like meatloaf, but I'm so picky. I want it to be meaty, but not just meat. I want it to have some veggies in it, but to have a nice blend instead of tasting like peas. I WANT MEATLOAF.
So here you are. After tasting, testing, and trial, we have the Double Meat Meatloaf.
Ingredients:
1 onion, diced
1 medium bell pepper (I used orange, but red would do just as well) diced
1 box of chicken stuffing and the seasoning packet, if it happens to be seperate
1 teaspoon ground pepper
2 cloves garlic
1 pound ground beef
1 pound ground pork (check your meat aisle)
2 eggs, beaten
Directions:
Preheat oven to 350. Oil or butter a bread loaf pan.
Mix together your onion, bell pepper, stuffing (and seasoning, if separate), garlic, and pepper really well with your hands. Squish in the beef and pork. (At this stage, I found that a kneading motion did the trick.) Make sure you've got all the dry stuff mixed through the meat. It won't be very tasty if you suddenly hit a patch of straight up stuffing. Mix in the eggs the same way. Squish everything into the loaf pan.
Bake for 50 minutes.
Pull out and drain off the grease (there will be a fair amount) and serve! Mmmmm
So here you are. After tasting, testing, and trial, we have the Double Meat Meatloaf.
Ingredients:
1 onion, diced
1 medium bell pepper (I used orange, but red would do just as well) diced
1 box of chicken stuffing and the seasoning packet, if it happens to be seperate
1 teaspoon ground pepper
2 cloves garlic
1 pound ground beef
1 pound ground pork (check your meat aisle)
2 eggs, beaten
Directions:
Preheat oven to 350. Oil or butter a bread loaf pan.
Mix together your onion, bell pepper, stuffing (and seasoning, if separate), garlic, and pepper really well with your hands. Squish in the beef and pork. (At this stage, I found that a kneading motion did the trick.) Make sure you've got all the dry stuff mixed through the meat. It won't be very tasty if you suddenly hit a patch of straight up stuffing. Mix in the eggs the same way. Squish everything into the loaf pan.
Bake for 50 minutes.
Pull out and drain off the grease (there will be a fair amount) and serve! Mmmmm
Saturday, May 31, 2014
Creamy Corn Chowder
Sometime many years ago, probably ten or more, I made a corn chowder that I absolutely loved. Being young and thoughtless, I never kept track of the recipe book I saw it in or what was in it and when the urge recently struck me to make it again, I couldn't find a single recipe that sounded similar.
So. To the labratory.
This is a straight-from-the-lab, no recipe influence, "I just think it tastes right", SSwS recipe.
Enjoy!
Ingredients:
4 tablespoons butter
1/2 small onion, diced (I prefer a finer dice to spread the flavor around better, but whatever works for you)
3 tablespoons flour
2 cups chicken broth
3 cups (roughly) corn kernals, either stripped off the cob fresh or THAWED frozen corn.* Purely a matter of how much work you want to put in.
6 springs of FRESH thyme**, plus more for decoration, if you like.
1/4 cup heavy cream
ground black pepper to taste
Directions:
Melt your butter over medium high heat and saute your onions until you can see through them (aka, transparent). Stir in the flour until you can't see any lumps and the butter is all cooked into the flour BUT NOT BURNT. If you have a gas stove, this may be tricky, so err on the side of underdone if need be. The flour may stick to the bottom of the pan a bit: no worries.
Add in the chicken broth and stir well, dragging your spoon on the bottom of the pan to push up any flour that stuck. Let everything simmer until it gets nice and thick like a thin gravy. (This is, for the curious, a roux.)
Dump in your corn and your thyme. Drop the heat to medium low and let simmer about ten minutes, stirring occasionally.
Fish out the pieces of thyme. If a leaf or two escapes, don't worry, but you want to make sure you get the stems. They don't taste good.
Stir in the heavy cream.
Season with black pepper to taste.
If you aren't serving immediately, drop to low. The soup may form a skin on top, but just stir it back in before serving, it's better than having a burnt layer on the bottom. You can keep it this way for about an hour.
Serve hot or cold, decorate with thyme sprigs if you like.
*Make sure you get a good brand. I like to look for keywords like "sweet corn" or "niblets" (not sure what "niblets" have to do with anything, but they're sweet). Bad corn makes bad chowder
**Leave it out rather than put in ground. Ground thyme will make your chowder taste like floor polish. Don't go there.
So. To the labratory.
This is a straight-from-the-lab, no recipe influence, "I just think it tastes right", SSwS recipe.
Enjoy!
Ingredients:
4 tablespoons butter
1/2 small onion, diced (I prefer a finer dice to spread the flavor around better, but whatever works for you)
3 tablespoons flour
2 cups chicken broth
3 cups (roughly) corn kernals, either stripped off the cob fresh or THAWED frozen corn.* Purely a matter of how much work you want to put in.
6 springs of FRESH thyme**, plus more for decoration, if you like.
1/4 cup heavy cream
ground black pepper to taste
Directions:
Melt your butter over medium high heat and saute your onions until you can see through them (aka, transparent). Stir in the flour until you can't see any lumps and the butter is all cooked into the flour BUT NOT BURNT. If you have a gas stove, this may be tricky, so err on the side of underdone if need be. The flour may stick to the bottom of the pan a bit: no worries.
Add in the chicken broth and stir well, dragging your spoon on the bottom of the pan to push up any flour that stuck. Let everything simmer until it gets nice and thick like a thin gravy. (This is, for the curious, a roux.)
Dump in your corn and your thyme. Drop the heat to medium low and let simmer about ten minutes, stirring occasionally.
Fish out the pieces of thyme. If a leaf or two escapes, don't worry, but you want to make sure you get the stems. They don't taste good.
Stir in the heavy cream.
Season with black pepper to taste.
If you aren't serving immediately, drop to low. The soup may form a skin on top, but just stir it back in before serving, it's better than having a burnt layer on the bottom. You can keep it this way for about an hour.
Serve hot or cold, decorate with thyme sprigs if you like.
*Make sure you get a good brand. I like to look for keywords like "sweet corn" or "niblets" (not sure what "niblets" have to do with anything, but they're sweet). Bad corn makes bad chowder
**Leave it out rather than put in ground. Ground thyme will make your chowder taste like floor polish. Don't go there.
Enchiladas like a fat girl
I don't fix Enchiladas when I'm trying to be healthy, I just don't. I know I'm going to eat more than I should, then eat it again for lunch the next day. They freeze just fine but...so delicious!
The trick to making enchiladas that aren't rubbery is your sauce. Not what's in it, but where you put it! Make sure to have a nice thick layer on the bottom of your pan and another fairly thick layer on top. Skimp at your own risk!
Ingredients:
1 pound ground beef (or chuck, or whatever your beefy preference is)
Taco seasoning (I like Ortega Hot and Spicy)
3 small cans (or 1 large, 1 small) of your preference of enchilada sauce
10 burrito tortillas
1 can of good black bean refried beans (Again, I've got a preference for Ortega)
4 cups of shredded cheese (I like some mexican blend, but whatever you like works)
Directions:
Preheat your oven to 400
Brown your ground beef and fix with taco seasoning according to the package directions. Set aside.
Coat the bottom of a LARGE, sheet pan sized, cake pan with about 1/4 inch of enchilada sauce. DO NOT SKIMP. I'm not kidding you here. If you don't have enough, your enchiladas will be completely stuck to the bottom of the pan and everything will come out sort of rubbery. It will not be good.
Pour the rest of your enchilada sauce into a large bowl. Open your can of refried beans and put a spoon in it. Put your cheese in a plate or a bowl. Open up your tortillas.
What you're about to do is messy. If you have help, great. If not...well, I usually do it by myself and just clean off the counter afterwards. Whichever!
Take a tortilla out of the bag and smother one side of it with enchilada sauce. On the opposite side, put a thin layer of refried bean down the center, top with a handful of meat, then a handful of cheese. Roll into a tube, then set seam side down in your cake pan, smooshing enchilada sauce between the tortilla and the pan.
Repeat until your pan is totally full, then top it off with the remaining sauce, meat, and cheese. Make sure you get sauce on the edges of the tortillas unless you like crispy edges.
Bake for about 20 minutes, or until the cheese bubbles.
(Just so you know, they're almost impossible to get out neatly. Who really cares though? So delicious!)
The trick to making enchiladas that aren't rubbery is your sauce. Not what's in it, but where you put it! Make sure to have a nice thick layer on the bottom of your pan and another fairly thick layer on top. Skimp at your own risk!
Ingredients:
1 pound ground beef (or chuck, or whatever your beefy preference is)
Taco seasoning (I like Ortega Hot and Spicy)
3 small cans (or 1 large, 1 small) of your preference of enchilada sauce
10 burrito tortillas
1 can of good black bean refried beans (Again, I've got a preference for Ortega)
4 cups of shredded cheese (I like some mexican blend, but whatever you like works)
Directions:
Preheat your oven to 400
Brown your ground beef and fix with taco seasoning according to the package directions. Set aside.
Coat the bottom of a LARGE, sheet pan sized, cake pan with about 1/4 inch of enchilada sauce. DO NOT SKIMP. I'm not kidding you here. If you don't have enough, your enchiladas will be completely stuck to the bottom of the pan and everything will come out sort of rubbery. It will not be good.
Pour the rest of your enchilada sauce into a large bowl. Open your can of refried beans and put a spoon in it. Put your cheese in a plate or a bowl. Open up your tortillas.
What you're about to do is messy. If you have help, great. If not...well, I usually do it by myself and just clean off the counter afterwards. Whichever!
Take a tortilla out of the bag and smother one side of it with enchilada sauce. On the opposite side, put a thin layer of refried bean down the center, top with a handful of meat, then a handful of cheese. Roll into a tube, then set seam side down in your cake pan, smooshing enchilada sauce between the tortilla and the pan.
Repeat until your pan is totally full, then top it off with the remaining sauce, meat, and cheese. Make sure you get sauce on the edges of the tortillas unless you like crispy edges.
Bake for about 20 minutes, or until the cheese bubbles.
(Just so you know, they're almost impossible to get out neatly. Who really cares though? So delicious!)
Subscribe to:
Posts (Atom)


.jpg)


.jpg)